

Social Media
-
Should I convert my Instagram page to be a business account?
By switching your Instagram profile to a business account, businesses of all sizes can access in-depth analytics about their followers and posts, have an overall more professional looking profile, and promote Instagram posts in the form of advertisements.
One of the biggest benefits that comes along with switching to an Instagram business profile is that it allows for an easier avenue to connect and learn with their followers.
Switching from a regular account to a business account is super easy. It can be done in five simple steps:
- Go to your profile and tap the settings icon:
in the top right corner next to "Edit Profile." (Note: The 'gear' button may show up as three dots depending on the device you're using - i.e.: Androids)
- Scroll down and click on Switch to Business Profile.
- Tap through the "Continue" until you reach the page that says "Choose Page." From here, you will select the Facebook Page you'd like to associate your business profile on Instagram with, if applicable.
- Be sure that your profile is set to public; private accounts do not allow the option to convert to business pages.
- On the Set Up Your Business Profile page, review your personal contact information, make any necessary edits and press Done.
- Go to your profile and tap the settings icon:
Email Setup and Use
-
How do I set up my Google Workspace email using Microsoft Outlook?
Outlook Email Settings: Name and Email
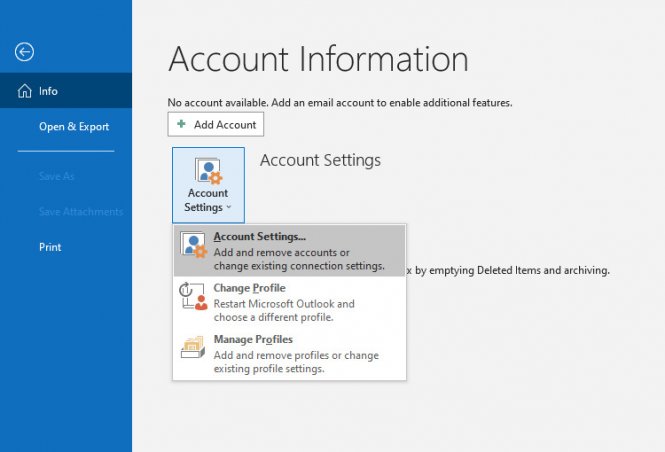
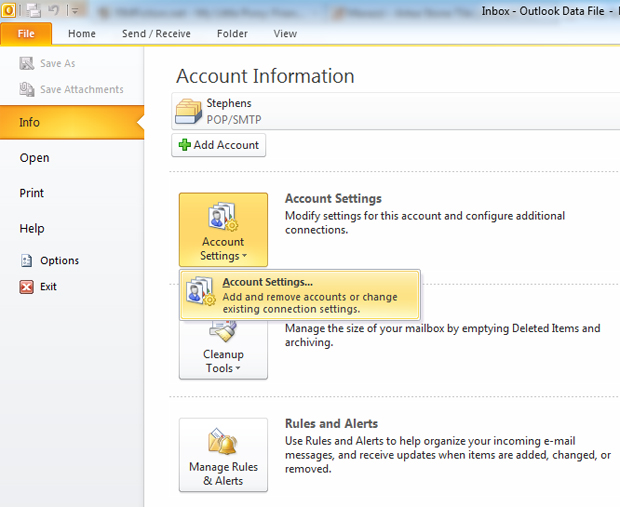
1. Add your Google Workspace email account selecting Accounts Settings under the File > Info menu.
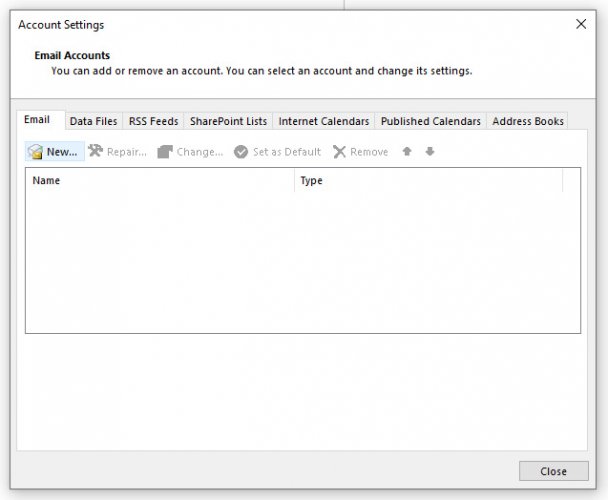
2. In the new "Account Settings" box that appears, click on "New".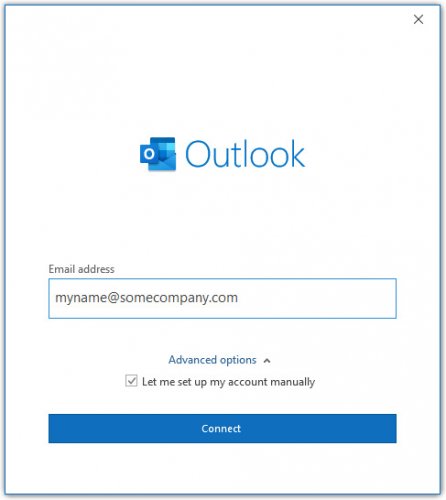
3. A dialog box will ask for your email. Choose "Let me set up my account manually" under Advanced options and click Connect.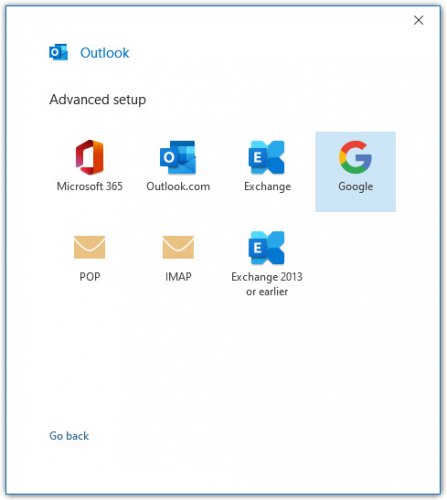
4. On the next screen, choose "Google".
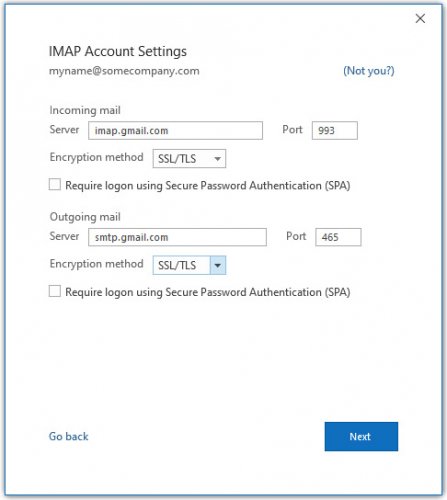
Outlook Email Settings: Server Settings
5. Under Incoming mail, enter imap.gmail.com and set the port to 993. Under Outgoing mail, enter smtp.gmail.com and set the port to 465. Both Encryption methods should be set to SSL/TLS. The account type should already be set to IMAP. Click Next.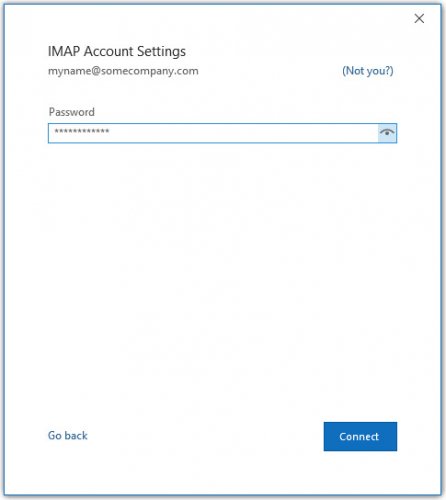
6. Enter your Google Workspace password. Click Connect.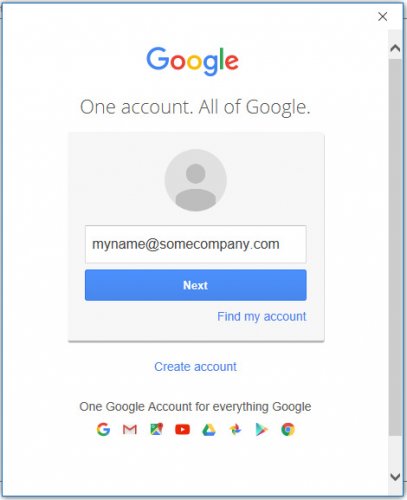
7. A new window will appear with the Google logo. Enter in your Google Workspace email and click Next.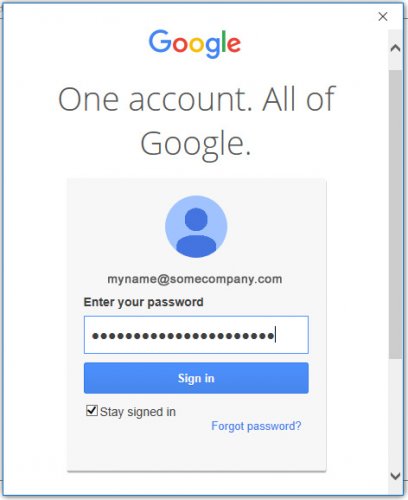
8. Enter your Google Workspace password. Click Sign in. Depending on your Google account settings, you may need to verify through your phone that you are allowing the connection between Outlook and Google to happen.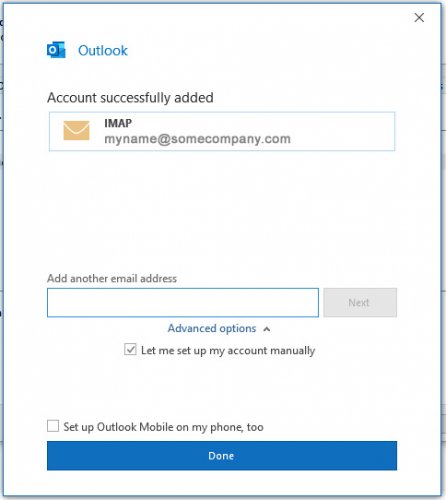
9. You should be all set! Click Done.Editing Outlook Settings for an Existing Account
If you want to edit an existing email account's settings, here are some guidelines.
1. Access your email account settings by selecting Accounts Settings under the File > Info menu.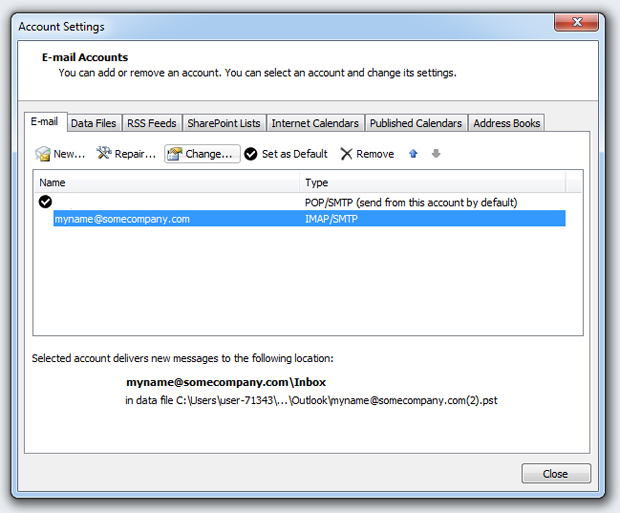
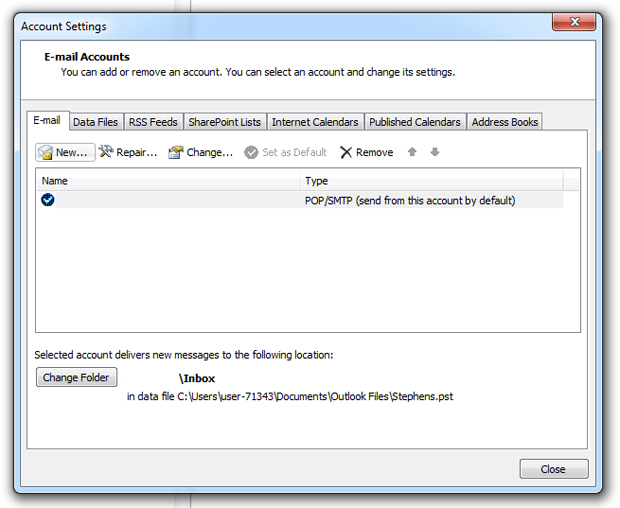
2. Select your Google Workspace account and click "Change ... "
3. Under Server Information, edit the server names and port numbers. Make sure the Encryption method is set to SSL/TLS. Click Next.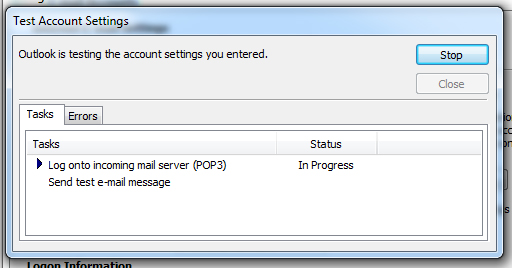
4. Outlook will run a test to check to make sure your settings are correct. Once it finishes, click Close here and Next on the Add New Account window.You should be all set!
-
How do I set up my Google Workspace email using Mozilla Thunderbird?
Thunderbird Email Account Setup
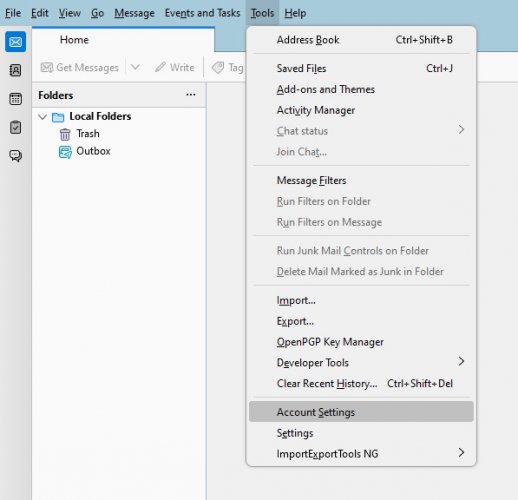
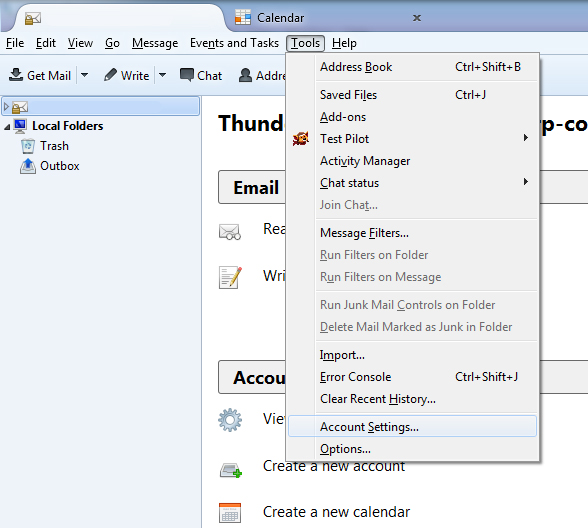
1. Add your Google Workspace email account by selecting Account Settings under the Tools menu.
2. In the new "Account Settings" box that appears, click on "Account Actions" then "Add Mail Account."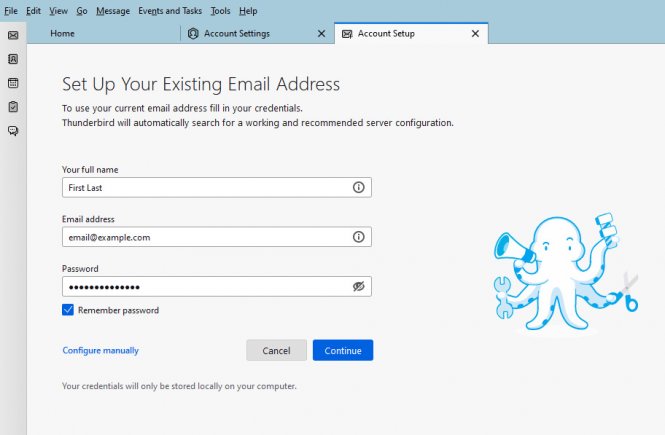
3. The "Account Setup" box appears. Enter your name (ex. "John Smith"), email address (ex. "myname@somecompany.com") and password here. Be sure to check "Remember password" and then click Configure manually.
Thunderbird Final Settings
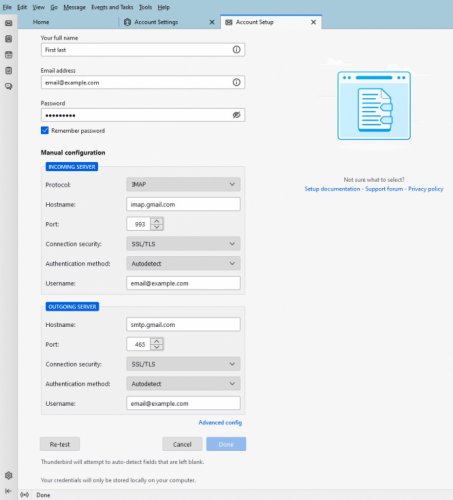
4. Enter in your "Username" (your email address, for example, "myname@somecompany.com"), your password, and choose IMAP for the "Protocol" setting. Set the "Incoming" server as imap.gmail.com with port number 993 and the "Outgoing" server as smtp.gmail.com with port number 465. The SSL dropdown settings should be set to SSL/TLS and Authentication to Autodetect for both "Incoming" and "Outgoing". Click Re-test.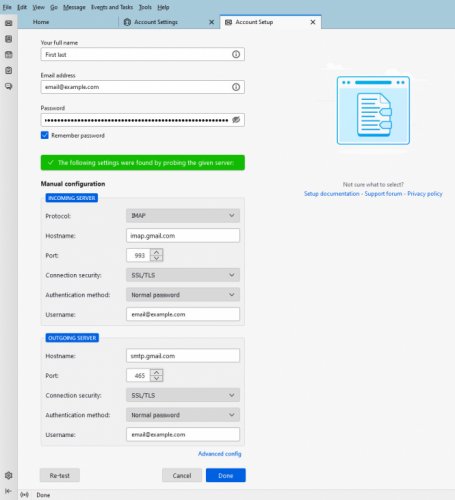
5. Thunderbird will once again perform a setting configuration. Once finished, click Done.You should be all set!
Editing Thunderbird Settings for an Existing Account
If you want to edit an existing email account's settings, here are some guidelines.
1. Access your email account settings by selecting Account Settings under the Tools menu.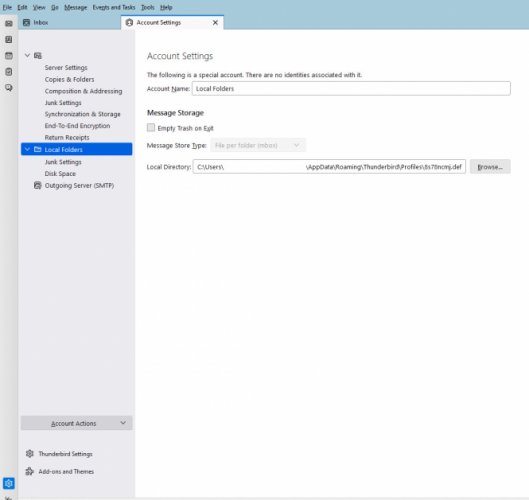
2. There will be a list of settings under your "Account Name" account.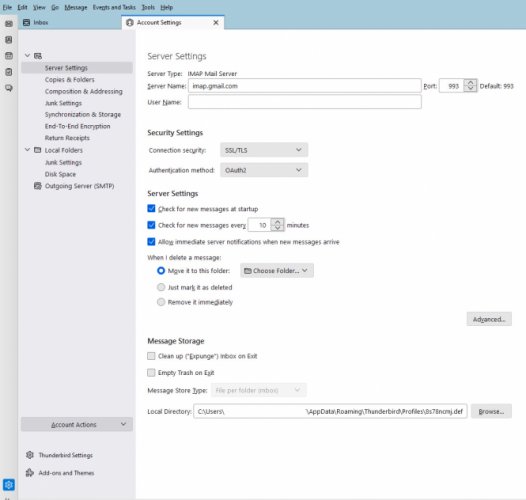
3. Click on the "Server Settings" tab to edit the incoming server name.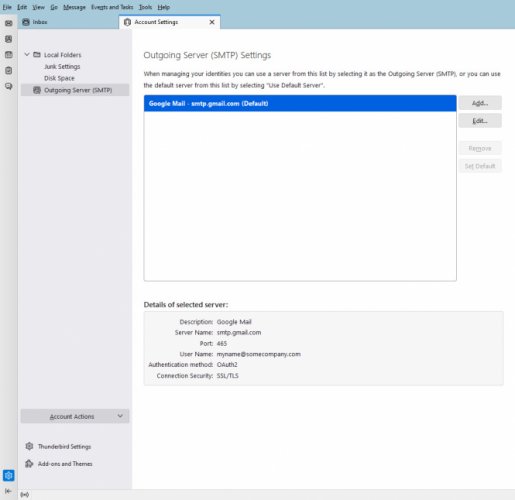
4. To change the SMTP server, click on the "Outgoing Server (SMTP)", choose the SMTP server you want to change then click on Edit.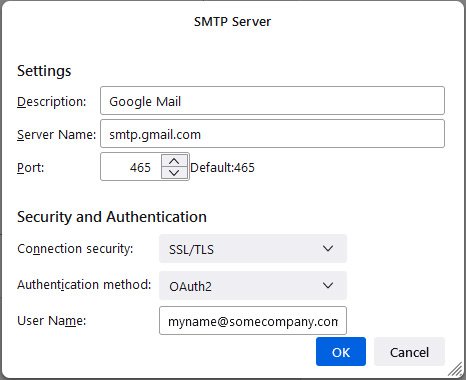
5. The "Description" will be the name you gave your account and under "Security and Authentication", choose SSL/TLS for "Connection security" and Normal password for "Authentication method".In the "User Name" dialog box use the same username as the incoming server (i.e. your email address, myname@somecompany.com)
You should be all set! The next time you try to connect a dialog box will appear asking for a password. Enter your password and select the option to remember so that you will not be asked to enter a password again.
-
How do I set up my Google Workspace email using Apple Mail?
Basic Apple Mail Settings
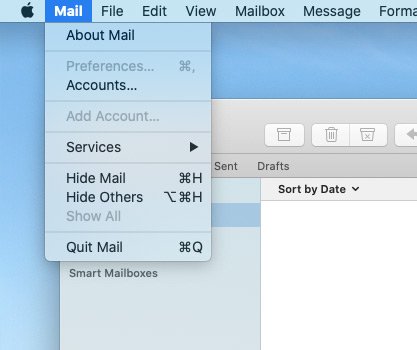
1. Add your Google Workspace email account by first selecting Preferences under the Mail menu.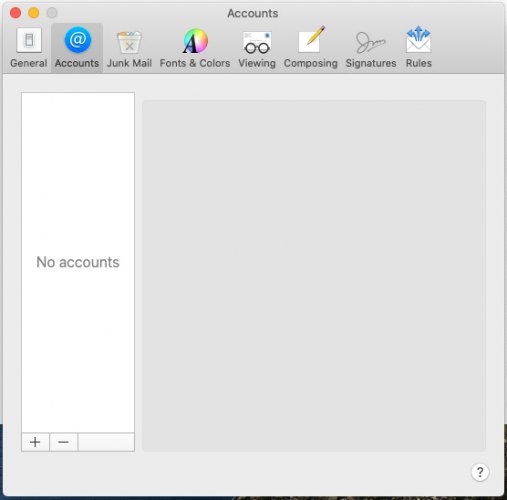
2. Click the + button to add an account.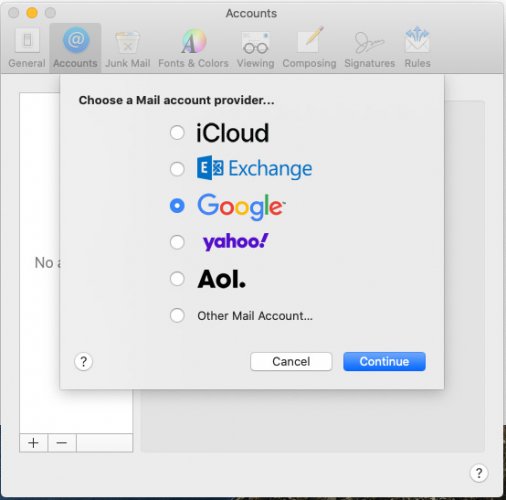
3. In the list of providers that appears, choose Google and click Continue.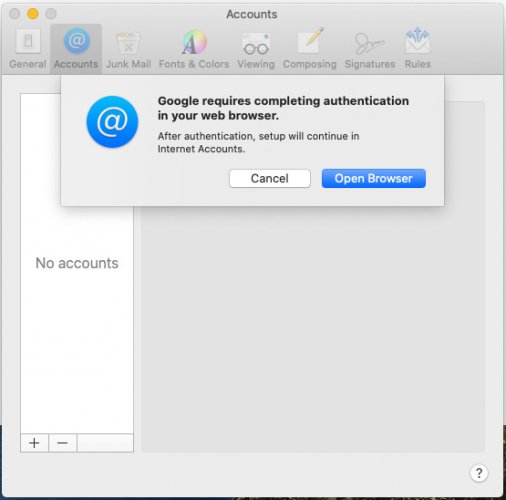
4. In the pop-up that appears, click Open Browser.
5. Enter your Google Workspace email address in the provided field and click Next.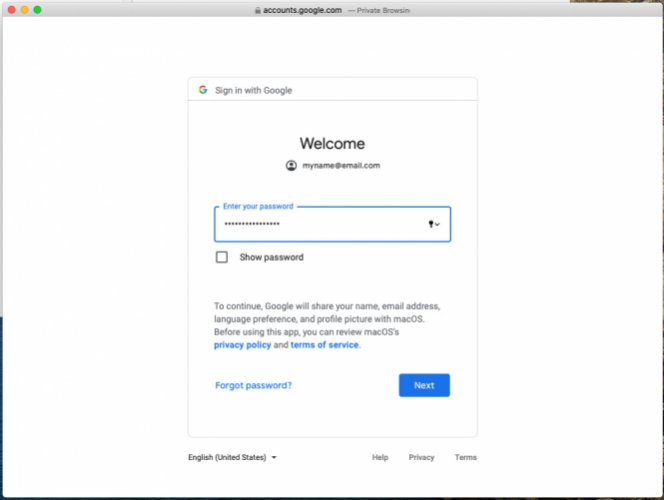
6. Next, enter your email password and click Next.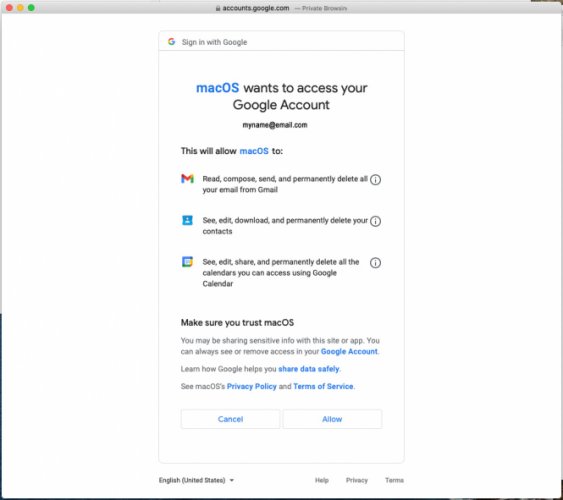
7. You will need to Allow the Mac to gain access to your Google Workspace account in order to proceed.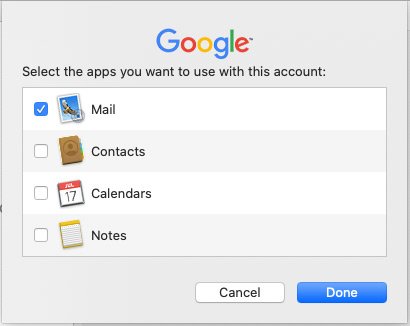
8. Finally, choose which services you would like to import from your Google Workspace account. Click Done.Apple Mail Outgoing (SMTP) Server Settings
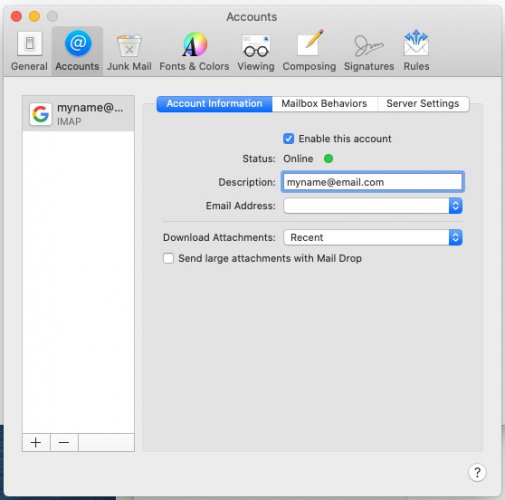
1. Most of the settings for Google Workspace will be added automatically by Apple Mail, so there's not much more to do for setup. However, if you need to make changes, follow these steps. To start, go to Mail > Preferences.
2. Click the Server Settings tab.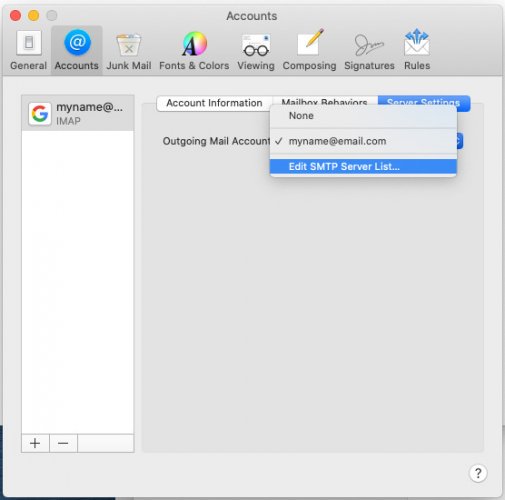
3. Choose Edit SMTP Server List in the drop down list.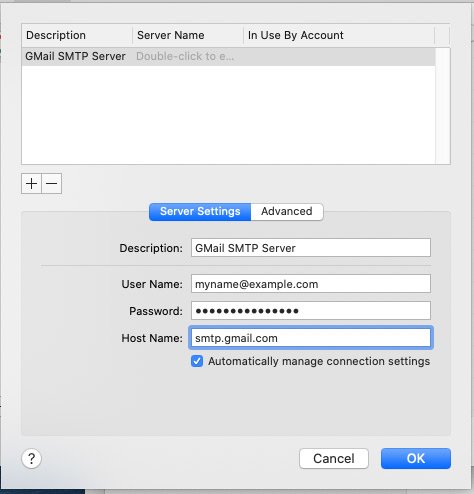
4. Any current SMTP server settings will be listed here. If there are none, you can add one by clicking the + button. Make sure the settings include your email and password. Choosing Automatically manage connection settings like in the image above will tell Apple Mail to make judgments on the settings. If settings need to be manually entered, be sure the Host Name is set to smtp.gmail.com and the port number is set to 465. -
How do I set up my Google Workspace email using iOS?
Basic iOS Settings
1. Choose Settings from the home panel.
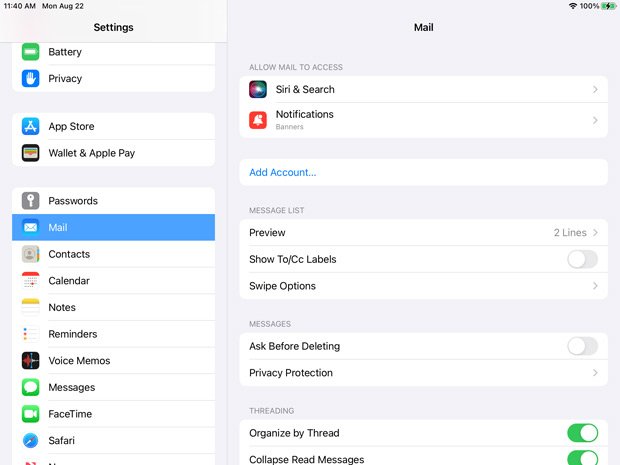
2. Under Mail, choose Add Account.
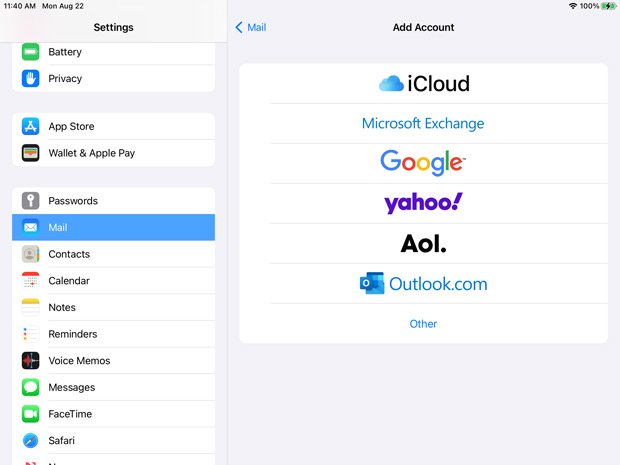
3. Choose Google in the list of accounts to create.
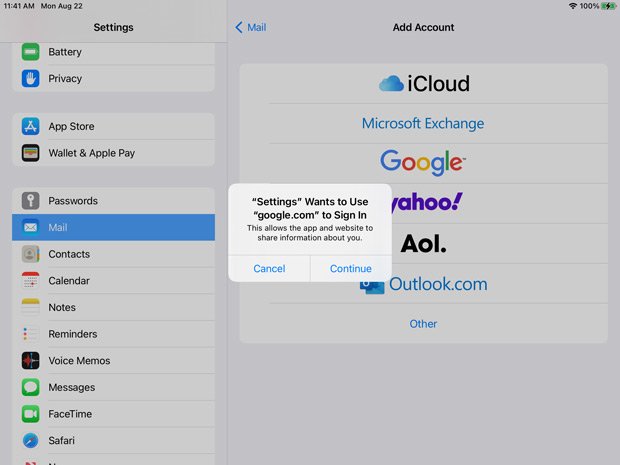
4. Choose Continue to allow the iPad to access your Google account.
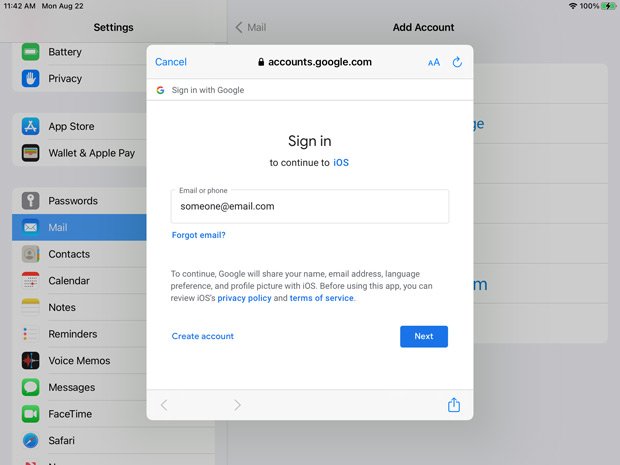
5. Enter in your email account here and choose Next.
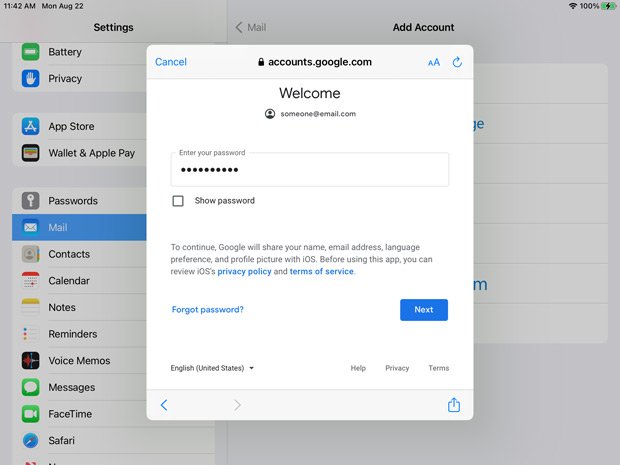
6. Enter in your email password here and choose Next. The iPad should automatically enter in the rest of the settings to connect to your Google Workspace account.
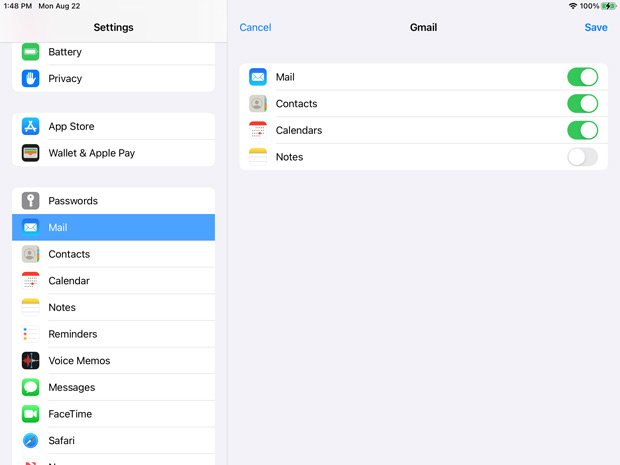
7. The iPad will prompt you to include any services that come with Google Workspace. Choose the ones you want to import and touch Save.
iOS Outgoing (SMTP) Server Settings
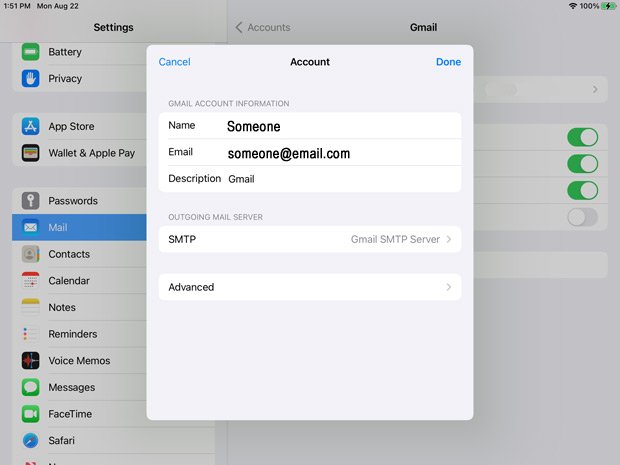
8. Once your settings have been saved, choose your account from the Mail > Gmail > Account screen. You'll get the above screen. Choose Advanced.
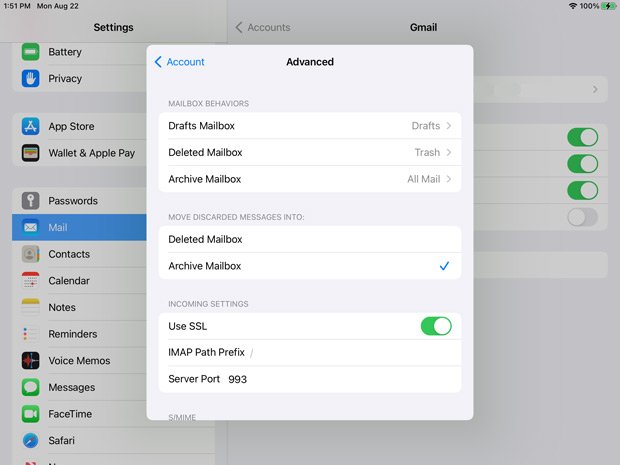
9. Most of the settings will be in already. Here you can customize how the server will respond when you download them to your iOS device.
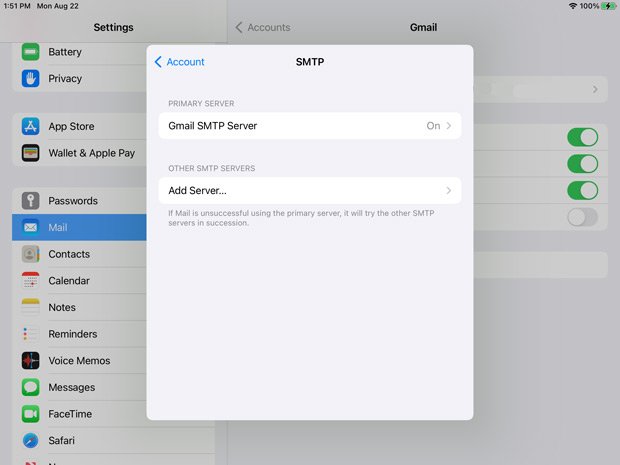
10. Go back to your Account screen and choose SMTP to get the above screen. Choose Gmail SMTP Server.
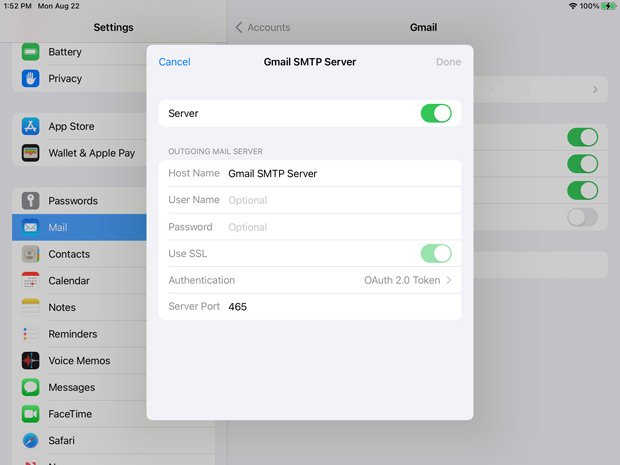
11. Make sure the Server Port is set to 465. Touch Done.
You should be all set!
-
How do I set up email using Microsoft Outlook?
Outlook Email Settings: Name and Email
1. Add your Corporate Communications email account selecting Accounts Settings under the File > Info menu.
2. In the new "Account Settings" box that appears, click on "New".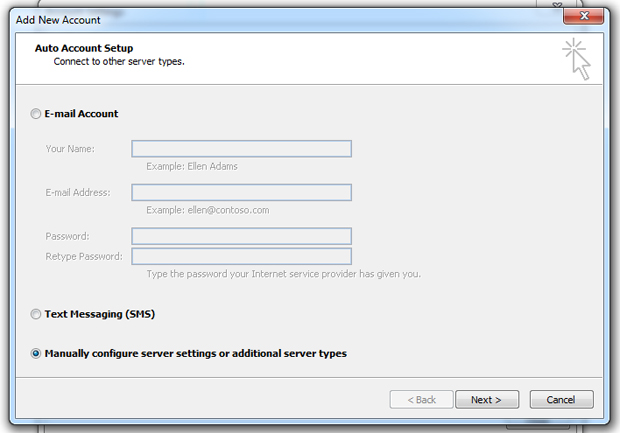
3. A dialog box will ask for the type of account you want to create. Choose "Manually configure server settings or additional server types" and click Next.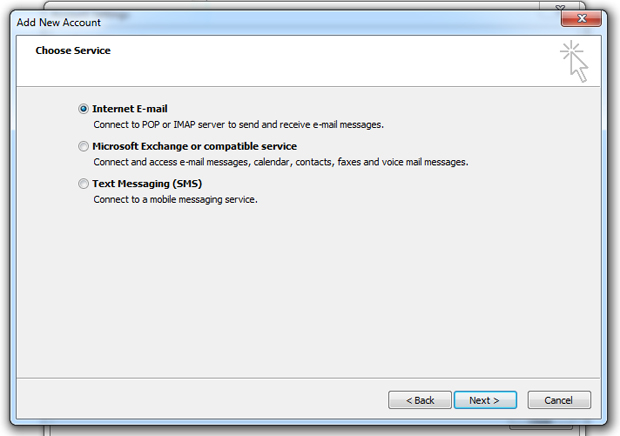
4. On the next screen, choose "Internet E-mail" and click Next.
Outlook Email Settings: Server Settings
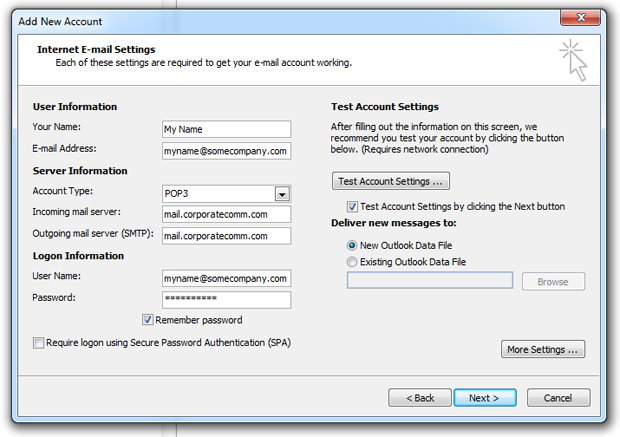
5. Here, enter your name and email address under User Information. Under Server Information, enter the mail server name located in your account sheet (ie, mail.corporatecomm.com) as BOTH your incoming and outgoing Server Names. The account type can be either POP3 or IMAP. Click More Settings ...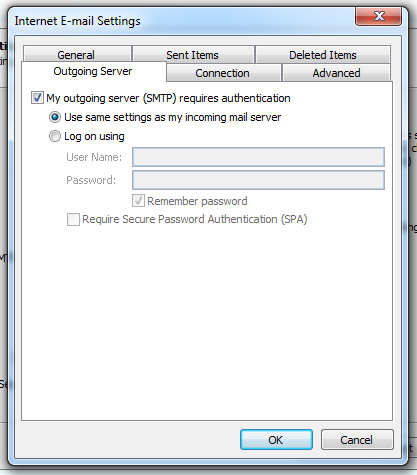
6. The Internet E-mail Settings window appears. Click Outgoing Server and choose "My outgoing server (SMTP) requires authentication" and "Use same settings as my incoming mail server". Click Advanced.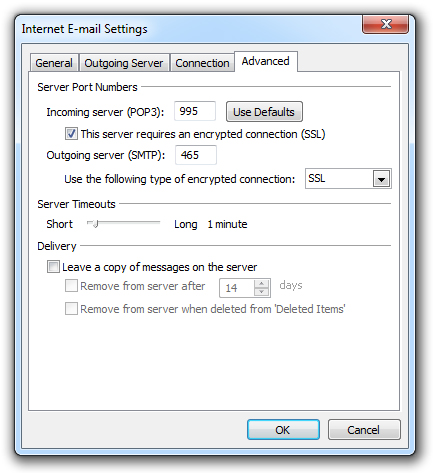
7. On the Advanced tab, check "This server requires an encrypted connection (SSL)". This will change the port number for the incoming server to either 995 or 993, depending on if you chose POP3 or IMAP. Underneath the Outgoing server field there will be a drop down menu. In that menu choose SSL then change the port number to 465. Click OK.
8. Back on the Add New Account window, click Next. Outlook will run a test to check to make sure your settings are correct. Once it finishes, click Close here and Next on the Add New Account window.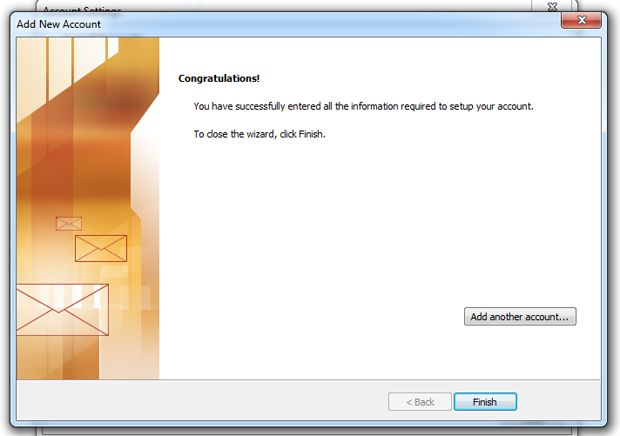
9. You should be all set! Click Finish.Editing Outlook Settings for an Existing Account
If you want to edit an existing email account's settings, here are some guidelines.
1. Access your email account settings by selecting Accounts Settings under the File > Info menu.
2. Select your Corporate Communications account and click "Change ... "
3. Under Server Information, edit the server names. Click More Settings ...
4. Under "Outgoing Server" choose "My outgoing server (SMTP) requires authentication" and "Use same settings as my incoming mail server". Click Advanced.5. On the Advanced tab, check "This server requires an encrypted connection (SSL)". This will change the port number for the incoming server to either 995 or 993, depending on if you chose POP3 or IMAP. Underneath the Outgoing server field there will be a drop down menu. In that menu choose SSL then change the port number to 465. Click OK.
6. Back on the Add New Account window, click Next. Outlook will run a test to check to make sure your settings are correct. Once it finishes, click Close here and Next on the Add New Account window.You should be all set!
-
How do I set up my CorporateComm email using Mozilla Thunderbird?
Thunderbird Email Account Setup
1. Add your Corporate Communications email account by selecting Account Settings under the Tools menu.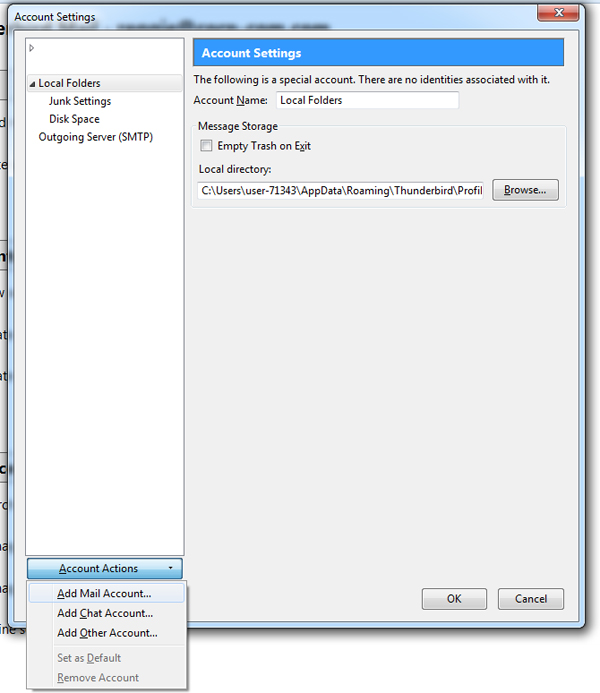
2. In the new "Account Settings" box that appears, click on "Account Actions" then "Add Mail Account."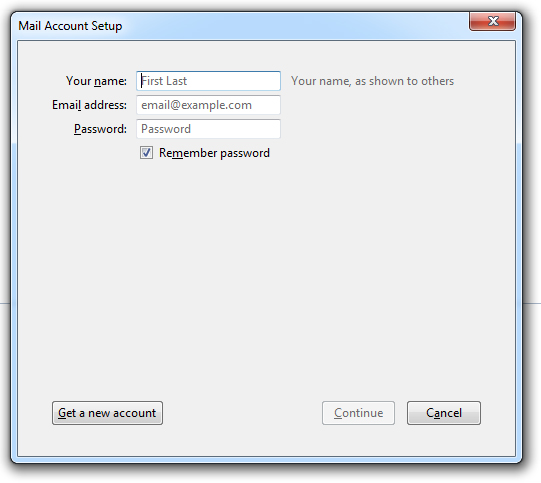
3. The "Mail Account Setup" box appears. Enter your name (ex. "John Smith"), email address (ex. "myname@somecompany.com") and password here. Be sure to check "Remember password" and then click Next.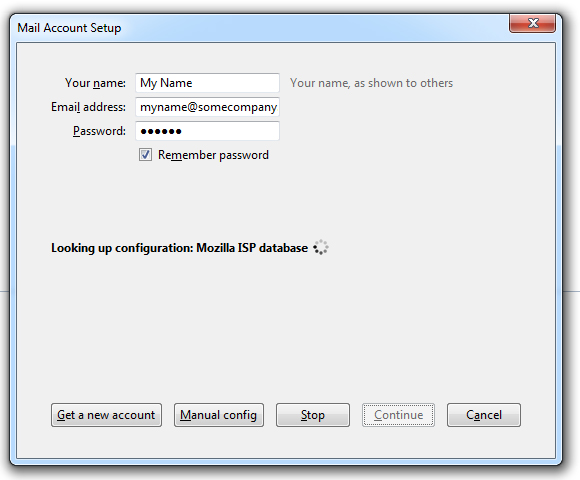
4. Thunderbird will then begin to search for email settings. Click Manual config.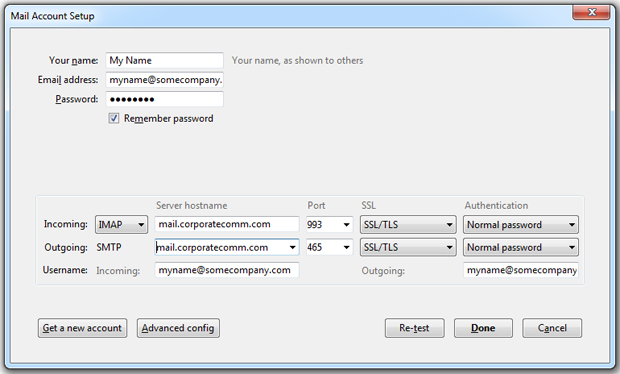
Thunderbird Final Settings
5. Once Thunderbird finishes its search, enter in your "Username" (your email address, for example, "myname@somecompany.com"), the "Incoming" server which is the mail server name located in your account sheet (ie, mail.corporatecomm.com) and the "Outgoing" server which is also "mail.corporatecomm.com". Choose POP3 or IMAP for the "Incoming" setting. The SSL dropdown settings should be set to SSL/TLS and Authentication to Normal Password for both "Incoming" and "Outgoing". Click Re-test Configuration.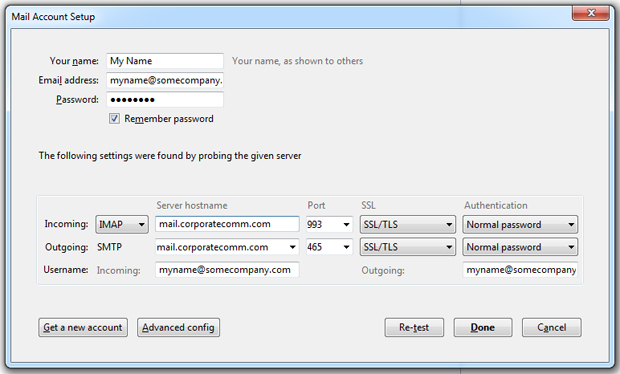
6. Thunderbird will once again perform a setting configuration. Once finished, click Done.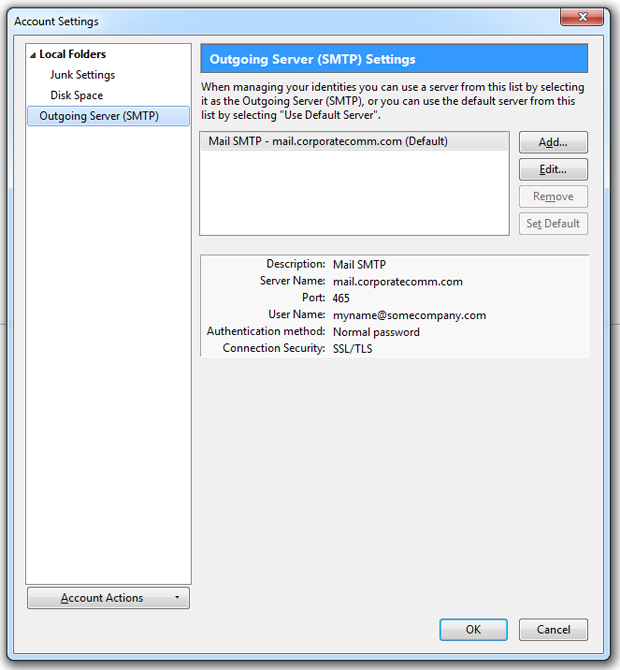
7. You'll be back at the "Account Settings" box. Click Outgoing Server and click "Add" in the Outgoing Server (SMTP) Settings.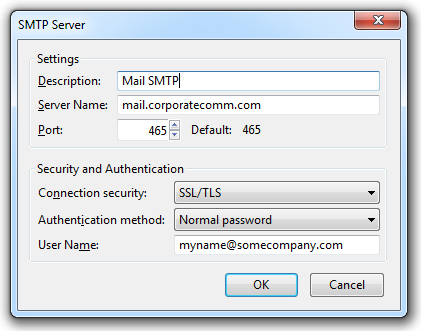
8. The "SMTP Server" box appears. For "Description" you can enter Outgoing. In the "Server Name" field, enter "mail.corporatecomm.com". The "Connection security" field should be set to SSL/TLS. The "Authentication method" should be set to Normal password. Finally, the "User Name" field is your email address (for example, "myname@somecompany.com"). Click OK.You should be all set!
Editing Thunderbird Settings for an Existing Account
If you want to edit an existing email account's settings, here are some guidelines.
1. Access your email account settings by selecting Account Settings under the Tools menu.
2. There will be a list of settings under your "Account Name" account.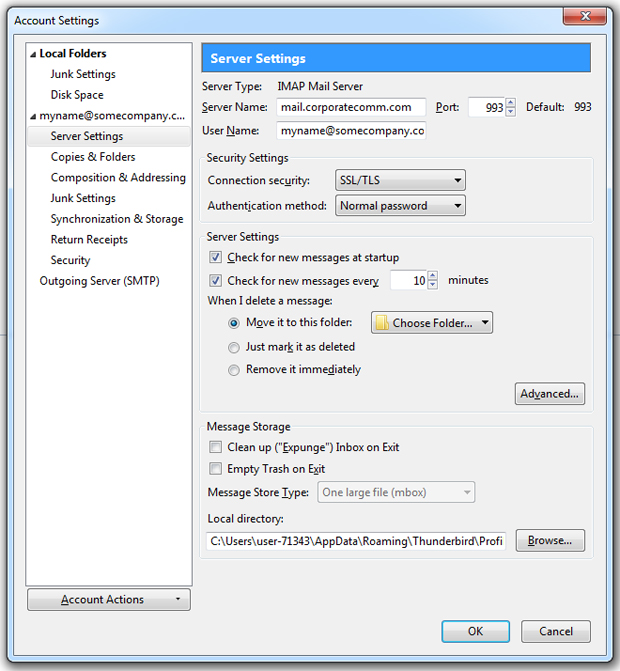
3. Click on the "Server Settings" tab to edit the incoming server name.
4. To change the SMTP server, click on the "Outgoing Server (SMTP)", choose the SMTP server you want to change then click on Edit.
5. The "Description" will be the name you gave your account and under "Security and Authentication", choose SSL/TLS for "Connection security" and Normal password for "Authentication method".In the "User Name" dialog box use the same username as the incoming server (i.e. your email address, myname@somecompany.com)
You should be all set! The next time you try to connect a dialog box will appear asking for a password. Enter your password and select the option to remember so that you will not be asked to enter a password again.
-
How do I set up my CorporateComm email using Apple Mail?
Basic Apple Mail Settings
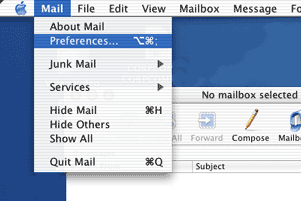
1. Add your Corporate Communications email account by first selecting Preferences under the Mail menu.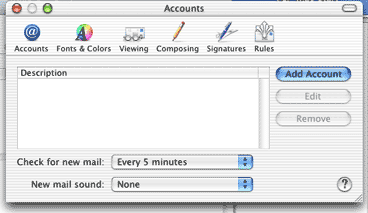
2. Click Add Account.
3. Add a descriptive name of your choice for your Corporate Communications mail account.
4. Add your Corporate Communications email address.
5. Add your first and last names.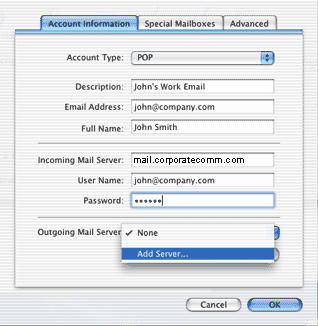
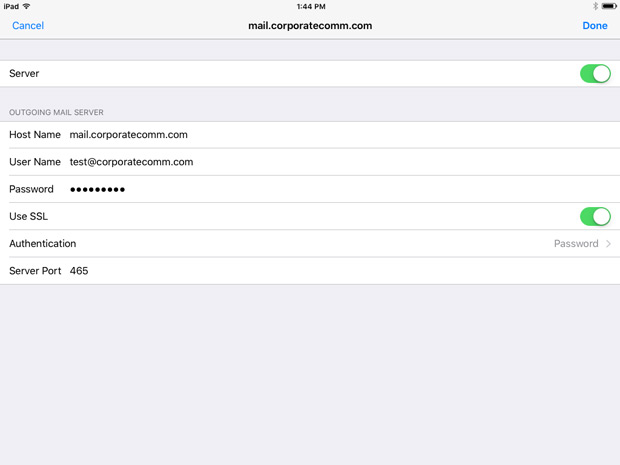
6. Enter the mail server name located in your account sheet (ie, mail.corporatecomm.com) as the incoming mail server. Enter your email address as your User Name, and enter your Password. Finally, you'll need to click "Add Server..." under Outgoing Mail Server.Apple Mail Outgoing (SMTP) Server Settings
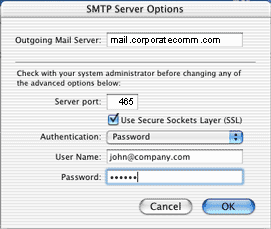
7. After clicking "Add Server..." a new window for SMTP Server Options will appear. Under Outgoing Mail Server, enter the mail server name located in your account sheet (ie, mail.corporatecomm.com).- Server port - Change to 465
- Use Secure Sockets Layer - Make sure this is checked
- Authenticiation - select Password
- User Name - your Corporate Communications email address
- Password - your Corporate Communications account passwordWhen done, click OK.
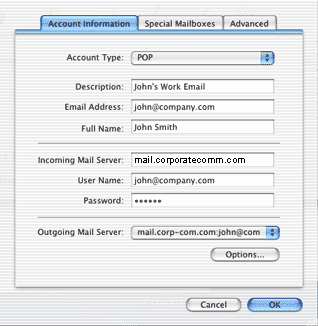
8. The new info you just entered should now show as the Outgoing Mail Server. Click OK.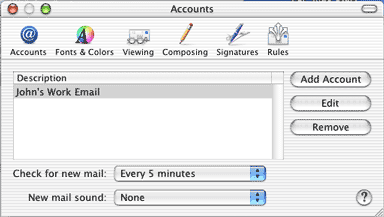
9. In the Accounts window, your Corporate Communications mail account should now show under the descriptive name you gave it previously (Part I - Step 3).If you need to edit its settings at any time, just return to this window, select the account, and click Edit. You can close this window and start using your email now!
-
How do I set up my CorporateComm email using iOS?
Basic iOS Settings
1. Choose Settings from the home panel.
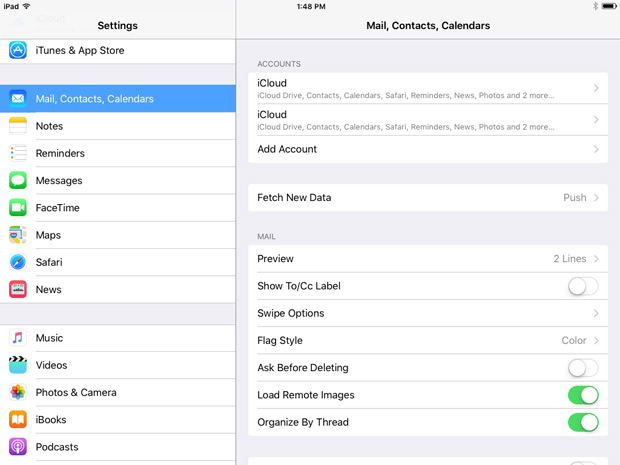
2. Under Mail, Contacts, Calendars choose Add Account.
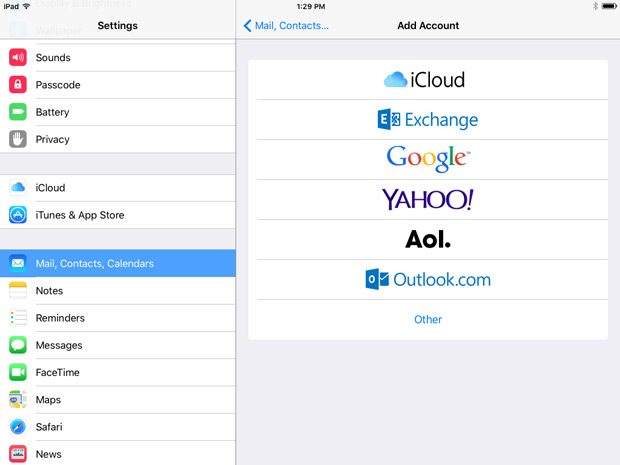
3. Choose Other in the list of accounts to create.
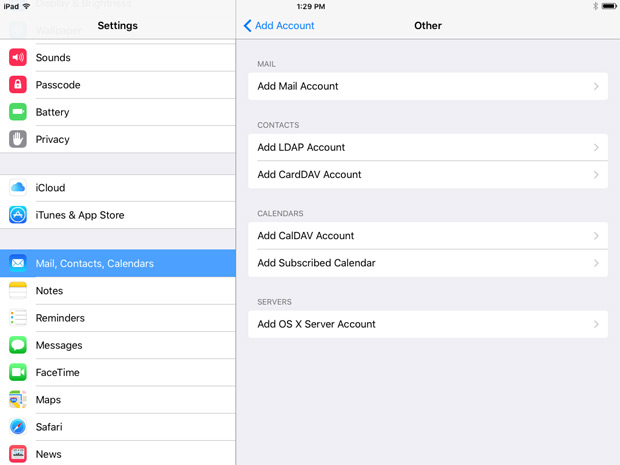
4. Choose Add Mail Account.
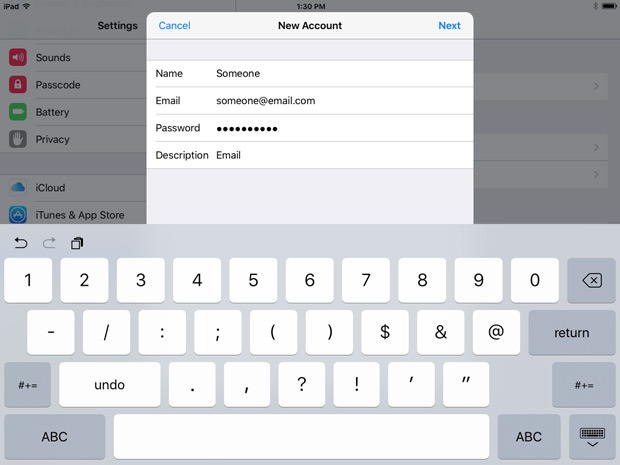
5. Enter in you name, email account and password here.
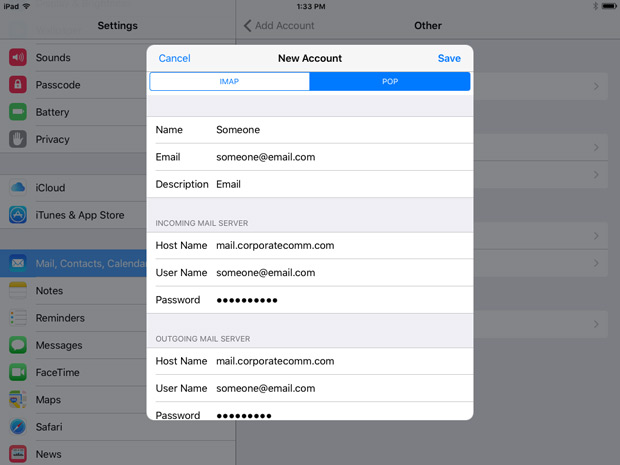
6. Make sure POP is chosen as the email type. Enter the mail server name located in your account sheet (ie, mail.corporatecomm.com) as the incoming and outgoing mail server. Enter your email address as your User Name, and enter your Password for both incoming and outgoing. Touch Save.
iOS Outgoing (SMTP) Server Settings
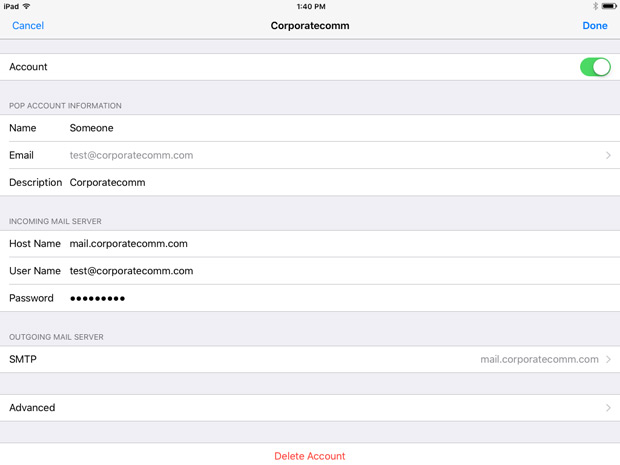
7. Once your settings have been saved, choose your account from the Mail, Contacts, Calendar screen. You'll get the above screen. Choose Advanced.
8. Most of the settings will be in already. Here you can customize how the server will respond when you download them to your iOS device.
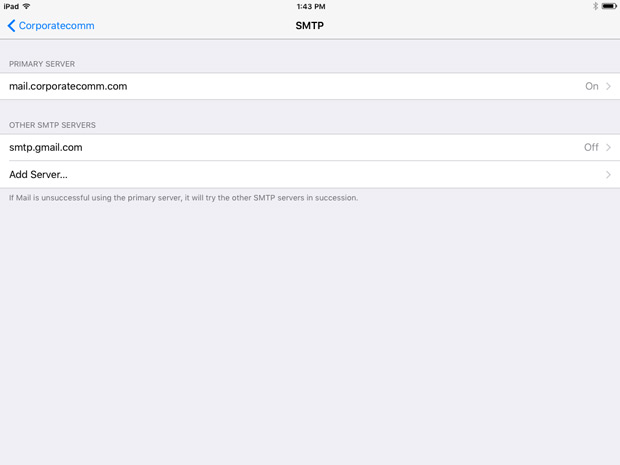
9. Go back to your Account screen and choose SMTP to get the above screen. Choose Primary Server, which should be mail.corporatecomm.com.
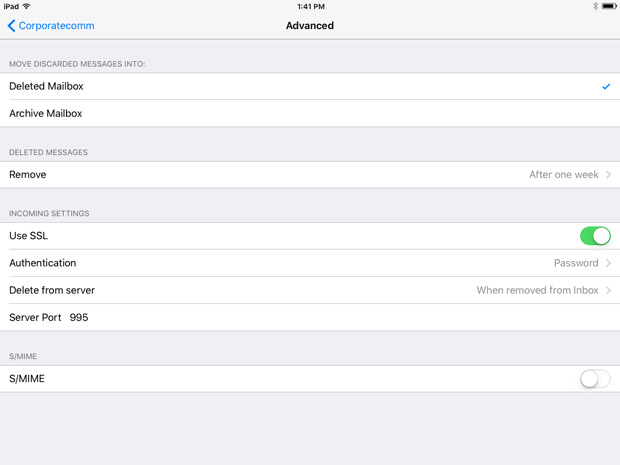
10. Make sure the Server Port is set to 465. Touch Done.
You should be all set!
Other Questions
-
Can I access my email using a web browser?
Accessing your email from the internet is simple when using a standard web browser Yes!
Accessing your email from the internet using a standard web browser is very simple! Start by directing your web browser to https://mail.corporatecomm.com. Next, using your web browser, enter in your Name (full Email address) and password in the page that loads, and click "Login." That's it! You now have complete access to your email. From any internet connection anywhere in the world, you can send receive and manage your email through a simple to use web browser.
-
Are there restrictions on either incoming or outgoing mail?
Attachments - YES, there is 4MB limit on attachments, either incoming or outgoing.
-
What can I do about SPAM?
Spam filters are installed on our mail servers. They mark incoming messages as spam by adding into the Subject, "[SPAM]." Depending on your email client (software) you can then have such messages automatically sent to a Junk folder or deleted, for example.
-
Why isn't my email being delivered/received?
First of all, please check your internet and email configuration settings. If you need help setting up a new mail account, please click here for help with Microsoft Outlook, Mozilla Thunderbird or similar configurations, or Apple Mail.
If you want to revise the settings on an existing email account, please click here for help with Microsoft Outlook, Mozilla Thunderbird or similar configurations, or Apple Mail.
-
How many email addresses do I have?
Most often this depends on your website hosting package.
-
What are aliases and how do they work?
An alias is an email address that forwards all the mail it receives to another email address (or several) that you specify.
For example, you could create an alias called info@myhostname.com for which all the mail would be automatically forwarded to you at another account, john@myhostname.com. If you wanted, the email sent to "info@myhostname.com" could be forwarded to more than one address, for example, john@myhostname.com and johnsmith@smith.com.
Alternatively, you can set up multiple aliases and have them forward to the same email. For example, you might have techsupport@yourdomain.com, orders@yourdomain.com, webmaster@yourdomain.com all forward email to johnsmith@smith.com.
-
Can I set up my email to auto-forward?
Yes. You can use an alias to auto-forward your mail. An alias is an email address that forwards all the mail it receives to another email address (or several) that you specify.
Read more about aliases here.
-
What is a catch-all account?
A catch-all account is an email address that collects all the mail sent to your domain name not sent to the other email addresses known to the server.
Any emails sent to misspelled recipients at your domain, for example, will be "caught" by the catchall account. For example, the catchall could be defined as all@domainname.com. Suppose an email meant for matt@domainname.com is actually sent, misaddressed, to matthew@domainname.com. The email will end up in the catchall mailbox of all@domainname.com. Without a catchall defined, the email would have been bounced back to the sender instead.
An advantage of the catchall is that it is like having unlimited aliases.
One disadvantage of a catchall is that more Spam may be sent to your domain since messages are not bounced but accepted by default to non-defined email recipients.
-
How do I export my Google data?
There may be times where you need to export your Google data, either to save as a backup or to import the data somewhere else.
- Log into your Google account.
- Go to https://takeout.google.com/. A list of all available Google data will load.
- Check each product that you want to export. Uncheck any that you don't want to export.
- In some cases, you can choose which format you want specific data to be in. For example, the Google Play Movies & TV can be set to export out as a CSV or JSON file.
- Some data have multiple data points. For example, Chrome allows you to choose specific data to export such as bookmarks, browser history, dictionary, and extensions.
- Once you have selected all the data you want to export, scroll down to the bottom of the screen and click Next step.
- The next section that appears asks you to choose how to get the data, either through email, Drive, Dropbox, OneDrive, or Box. Select the method that works best for you.
- Choose if this will be a one-time Google data export or a year long occurrence.
- Choose if you want the file to be compressed by zip or tgz.
- The last option to select is how many files you'll be sent if the total size reaches a certain amount.
- Finally, click Create export.
- The Export progress dialog will display the status of the Google Data collection for the account. Once completed, the file(s) will be sent to your designated location.
Security
-
What makes a good/bad password?
Good passwords are made up of a few key components including randomness, complexity and length. If your password is predictable, simple and or/short, chances are it is less secure. A combination of random letters, numbers and characters will be less likely to be hacked into.
Websites
-
When does it make sense to create separate sites?
If you find yourself asking this question, chances are your business offers several different services. So, you're probably wondering if it's easier to make separate microsites with independent links and addresses that can be accessed from your main site, or if it makes more sense to create one website consolidating all of the information in one place.
Before you make your final decision, consider these two questions:
- Will the separate site have a different audience than your main site?
- Will the new site have different goals?
If you answered 'yes,' to both of the above questions, chances are it may make sense for you to move forward with the development of a separate site.
In any other case, it may be a better idea so simply create subpages off of your main site. This could save you hundreds of dollars and hours in the long run.
-
How often should I be updating the content on my website?
Keep your content fresh. Website content requires constant updates. Make sure your current resources, product launches, latest news, upcoming events, and program details are posted on a regular, monthly basis. Give your visitors a reason to keep coming back. Change is good for both loyal users as well as those looking to find you online. Search marketing relies heavily on continuously adding new content to your web presence.
-
What is a FQDN?
FQDN stands for Fully Qualified Domain Name. Which is great if you know what a Fully Qualified Domain Name is – if not, read on!
A FQDN is a unique and complete address (URL) used to direct traffic on the internet to a specific location or internet IP address. The biggest characteristic is that a FQDN can only be interpreted in one way, meaning that entering a FQDN in a browser URL field for example, will take the user to only one place. This allows website hosting companies and authentication services to pinpoint exactly where they want their content to be located.
The formatting or syntax of a FQDN is very specific – which enables the system to work around the world.
FQDN Formatting
There are 3 elements of FQDN formatting.
- TLD – Top Level Domain
The ending characters that appear in an FQDN – normally 3 or 2 characters (.com, .edu, .net etc.) - Sub Domain – Is the domain that appears under the TLD – DOMAIN.com for example
- Hostname – the hostname is the leading characters of the FQDN (www in the case of www.domain.com) A domain holder can create countless hostnames as they related to a subdomain. For example:
- mail.domain.com
- ftp.domain.com
- www.domain.com
Next time you enter a URL into a browser, take a moment to look at and break down the FQDN into it’s parts. - TLD – Top Level Domain
-
What does the acronym LAMP stand for?
LAMP is an acronym used when discussing websites and web development that stands for: Linux, Apache, MySQL, and PHP.
SEO
-
How do you exclude your IP address from your analytic reports?
If you're looking to get the most accurate client data results from your analytic reports, you may want to consider excluding your own IP address. By doing so, you can more easily distinguish real visitors from your own visits. The purpose behind doing so is to focus solely on external customers' behavior without your internal traffic skewing the data at all.
To do so, it's really a quite simple step-by-step process:
- First, you'll have to identify your IP address. Luckily, Google makes this quite simple for us. All you need to do is Google "What is my IP" and you'll be able to view your public IP address.
- Next, create a filter in Google Analytics by clicking on "Admin" in the upper right-hand corner. From here, you will create a new view for “No Internal Traffic”. Click on ‘Filters’ and ‘+Add Filter’.
- Now you will name your filter to mark the exclusion of internal company traffic IP addresses. Select 'Predefined' as the filter type and then 'Exclude' from the Predefined filter types.
- Lastly, all you have to do is simply verify your filter to ensure that it worked. You can do so by monitoring traffic in the filtered view.
- First, you'll have to identify your IP address. Luckily, Google makes this quite simple for us. All you need to do is Google "What is my IP" and you'll be able to view your public IP address.
-
Why is my Google Analytics recording zero visitors from other websites?
Websites that are secured with HTTPS will not pass referral information to invalid/insecure sites (HTTP). So if your website is secure but other partner websites are not, the referred data is not being passed. Visits are still being recorded, but because the referred data is not passing, you are unable to tell where exactly the visits are coming from.
To fix this issue, the originating site (with the links to other sites) need to use the meta referrer tag, OR the second site (that is being linked to) has to be secure and the links pointing to that site need to also be secured.
So, the root of the issue is secured sites to non-secure sites. Non-secure sites to other non-secure sites do not cause the issue, nor will secure to secure sites.
It's also important to note that the latest specification for meta tag is not supported in every browser.
To learn more about securing your website, read this blog post explaining the importance of converting your website to HTTPS.
-
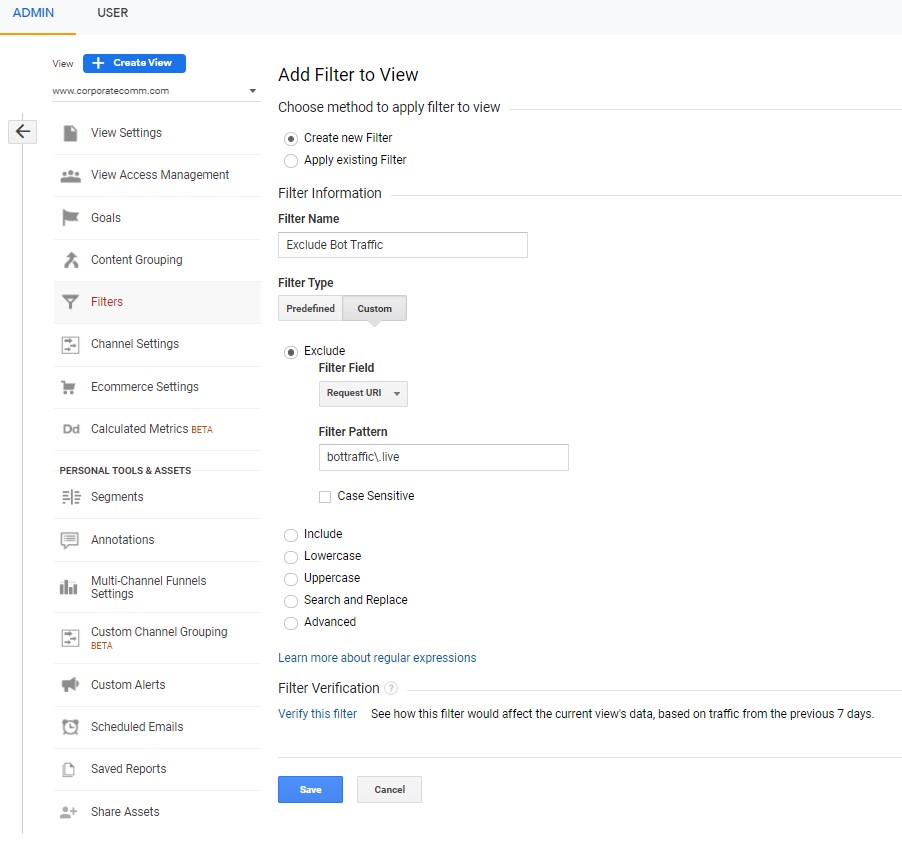
How do I filter bot traffic in Google Analytics
Filtering bot traffic in Universal Analytics and GA4
Google Analytics is a great tool for monitoring website traffic, conversions, and obtaining business intelligence. Bot traffic, however, can ruin your Google stats and affect bounce rates, session duration, conversion rates, and so much more.
Typically, signs of bot hits include a massive uptick in site traffic, extremely high bounce rates, and extremely low session duration.


Keep an eye out for URLs hitting your site that look like this:
- trafficbot.life
- bottraffic.live
- bottraffic143.xyz
The best way to block these traffic bots is to set up Google Analytics filters - here's how to do it:
Universal Analytics:
1. Sign in to Google Analytics, select the gear icon in the bottom left, and select "Filters"
2. Select "ADD FILTER"
3. Select "Create New Filter" and fill out Filter Information:
- Filter Type: Custom
- Exclude:
- Filter Field: Request URI
- Filter Pattern: bot traffic URL
4. Verify your filter (showing data from last 7 days)
5. Save
GA4 Analytics:
*note* - GA4 Analytics filters out bot and spam traffic automatically. However, here are the steps if you want to filter internal traffic or a specific URL from GA:
1. Sign in to Google Analytics, select the gear icon in the bottom left, and select "Data Streams"
2. Select your site URL
3. Under "Additional Settings" select "More Tagging Settings"
*4a. For filtering internal traffic, select "Define Internal Traffic," and select "Create"
- Rule name: Internal Traffic
- traffic_type_value: internal
- IP Address:
- Match type: IP address equals
- Value: internal IP address
- Click "Create"
*4b. For filtering specific URL traffic, select "List unwanted referrals"
- Match type: Referral domain contains or exactly matches
- Domain: bot traffic URL
5. Save
If you want help setting up Google Analytics or need an effective SEO strategy, contact us today!
-
What does NAP stand for?
Extremely important for Google local search rankings and because it helps search engines and customers easily find and contact a local business. The acronym; NAP is short for “Name, Address and Phone Number.”
Things to consider regarding NAP:
- Name - Consistency in your business name across all listings and citations makes it easier for search engines to understand the business identity and prevents duplicate or conflicting listings.
- Address - The full physical address must be consistent everywhere the business listing appears. This signals to search engines the specific geographic location of the business.
- Phone number - Pretty self explanatory -- if you are looking for customers to call your business, providing a consistent and accurate primary phone number across all listings and citations is a must.
- Listings - NAP should be consistent on key local listings like Google My Business, Apple Maps, Bing Places, Yelp and other directories. This consistency helps aggregate reviews and signals authority.
- Citations - The NAP should also appear on local business citation sites & directories across the web. The more quality citations, the stronger the local SEO foundation.
- Schema markup - Businesses can include NAP schema markup on their website to further improve visibility & generate rich snippets.
Branding
-
What are some good cost effective ways to build better brand awareness?
Educate, entertain and engage!
Provide valuable content and/or tools that will engage your target audience and build brand credibility. Share a more personal side of your organization in a fun, lighthearted manner that connects your brand with your consumers. Always create the best possible experience to encourage your users to appreciate your brands' value and prefer your products and/or services over your competition.
Start implementing these tactics and watch them become your brand advocates!
-
What is the difference between a logo and branding?
A logo is a graphic element or mark used to represent and identify your company and/or product. Your logo plays a significant role in your brand marketing, but it’s not your brand. Branding addresses the entire user experience and ensures that your visual identity is used consistently across all touch points of your marketing and advertising.
Marketing
-
What is a cohesive multi-channel approach?
A cohesive multi-channel approach involves using multiple marketing channels (like social media, email, website, print ads, etc.) in a coordinated way to reach and engage your target audience.
Here's the breakdown:
- Unified Message: The core message and brand identity remain consistent across all channels. This builds brand recognition and trust.
- Customer Journey Focus: The strategy considers the entire customer journey, from awareness to purchase and beyond. Each channel plays a specific role in guiding the customer along this path.
- Data-Driven Decisions: Marketing efforts are tracked and analyzed to understand what's working and what's not. This data informs adjustments to the strategy for continuous improvement.
- Customer Experience: The goal is to create a seamless and positive customer experience across all touchpoints. This means avoiding conflicting messages or frustrating experiences for the customer.
Key Takeaway: It's not just about using many channels; it's about using them strategically to create a consistent and impactful brand experience for your customers.